YouTube marble DIY table maze: Unleash your inner architect and create a mesmerizing, handcrafted masterpiece! This guide dives deep into the world of crafting intricate table mazes using marbles. From selecting the perfect materials to mastering the art of layout and construction, we’ll equip you with all the knowledge needed to design and build a stunning table maze that’ll captivate viewers on YouTube.
Discover the exciting process of planning, building, and presenting your table maze, ensuring it’s both beautiful and functional. Learn how to choose the right materials, tools, and design elements to create a captivating YouTube video that showcases your unique project.
Materials and Tools
Building a mesmerizing marble DIY table maze is a rewarding project that combines creativity and precision. From choosing the perfect materials to mastering the right tools, understanding the specifics of each element is key to a successful outcome. This section will delve into the crucial components, providing a comprehensive overview of everything you need for your own captivating maze.The core elements of a DIY marble maze are the base, the maze structure itself, and the marbles.
The right combination of materials and tools will determine the maze’s longevity, aesthetic appeal, and overall playability. This guide will help you navigate the choices and ensure your project is a success.
Materials
A successful marble maze requires careful selection of materials. The base forms the foundation, the maze itself dictates the pathways, and the marbles determine the flow. Choosing the right materials ensures the maze is durable, visually appealing, and enjoyable to use.
- Base Material: Plywood, hardboard, or even a large piece of acrylic sheet can serve as the base. Plywood is often a popular choice due to its strength and relatively low cost. Consider the size of your desired maze and the weight it will need to support.
- Maze Structure Material: Cardboard, craft foam, or even thin wood planks can be used to create the walls and obstacles. Cardboard is readily available and inexpensive, while craft foam offers a flexible alternative for intricate designs.
- Marble Choice: Small, smooth marbles are essential for the maze. Plastic or glass marbles are common choices, offering different aesthetic and tactile experiences. Consider the size and weight of the marbles to ensure smooth passage through the maze. Plastic marbles are generally less expensive and suitable for younger audiences.
Tools
A well-equipped toolbox is essential for precision and efficiency. Different tools are needed for measuring, cutting, and assembling the maze components.
- Measuring Tools: A ruler, measuring tape, and a pencil are crucial for accurate measurements. Precise measurements ensure the maze fits your intended space and that the pathways are consistent.
- Cutting Tools: A craft knife or a utility knife is necessary for cutting the base material and the maze structure. A sharp blade ensures clean cuts and prevents damage to the materials. Consider using a cutting mat to protect your work surface.
- Assembling Tools: Glue, tape, or screws are needed for securing the maze components. The chosen method depends on the materials used. Glue offers a clean and versatile solution, while tape is quick and easy for temporary structures. For more permanent structures, screws provide a sturdy and secure connection.
Marble Types
Different types of marbles offer varying aesthetics and properties. Choosing the right type depends on the intended use and visual effect.
- Plastic Marbles: These are typically the most affordable option, are lightweight, and generally suitable for children’s projects. They come in various colors and sizes.
- Glass Marbles: Glass marbles offer a more sophisticated aesthetic and are often heavier. They are durable but more expensive.
Cost Table
This table provides an estimated cost for materials and tools, categorized for clarity. These figures are estimations and can vary based on location and retailer.
| Item | Category | Estimated Cost (USD) |
|---|---|---|
| Plywood Sheet (4ft x 8ft) | Base Material | $15-$25 |
| Cardboard Sheets | Maze Structure | $5-$10 |
| Plastic Marbles (100 pcs) | Marble | $5-$10 |
| Craft Knife | Cutting Tools | $5-$10 |
| Glue Sticks | Assembling Tools | $3-$5 |
| Measuring Tape | Measuring Tools | $5-$10 |
Design and Layout: Youtube Marble Diy Table Maze
Crafting a captivating marble DIY table maze involves more than just arranging colorful marbles. The design and layout significantly impact the visual appeal and the overall experience of navigating the intricate pathways. Careful consideration of styles, patterns, and complexity levels will transform a simple tabletop into a mesmerizing artistic masterpiece.The design choices, from the color palette to the pathway complexity, play a crucial role in the appeal of the maze.
I’ve been totally obsessed with those YouTube marble DIY table mazes lately. The intricate designs are seriously inspiring, but sometimes crafting can get pricey. Luckily, you can save on beautiful, high-quality cookware like Caraway ceramic, which is perfect for your next DIY project or everyday cooking save on caraway ceramic cookware. It’s definitely a smart way to upgrade your kitchen while keeping your crafting budget in check.
And with the savings, you can focus on making those gorgeous marble table mazes without worrying about the cost!
Understanding these elements allows for the creation of a visually engaging and challenging experience for both the creator and the explorer.
Common Design Styles
Different design styles influence the aesthetic and the complexity of the marble maze. Modern minimalist designs often feature clean lines and geometric patterns, utilizing a limited color palette for a sophisticated look. Alternatively, vibrant and whimsical styles incorporate bold colors and organic shapes, creating a playful and engaging experience. Vintage-inspired designs draw on traditional patterns and color combinations, evoking a sense of nostalgia and charm.
Ultimately, the choice of design style is a matter of personal preference and artistic vision.
I’ve been obsessed with those YouTube marble DIY table mazes lately. The intricate designs are so cool, and I’m always looking for new ideas. Speaking of cool, did you see the amazing deals on Apple M3 MacBook Pro, iMacs, and Sony Inzone gaming headsets? This sale is definitely worth checking out if you’re in the market for a new computer or headset to power your next marble maze creation! The perfect setup for hours of fun, building those intricate pathways.
Layout Patterns and Techniques
Creating intricate pathways is key to a compelling marble maze. Simple linear patterns, such as straight lines and gentle curves, are excellent for beginners. As the skill progresses, more complex patterns, including loops, spirals, and interconnected networks, can be incorporated. Employing techniques like layering marbles with different colors or textures adds depth and visual interest. Precise placement and careful planning are crucial for ensuring the maze’s smooth navigation and structural integrity.
Design Inspiration for Table Mazes
Drawing inspiration from diverse sources can spark creativity. Nature-inspired designs can incorporate leaf patterns, floral motifs, or flowing water forms, evoking serenity and beauty. Geometric patterns, from triangles to hexagons, offer structure and visual appeal. Abstract designs, using a mix of colors and shapes, encourage experimentation and unique artistic expression. Similarly, incorporating pop culture references, such as iconic movie scenes or famous landmarks, can add personal touches and generate a theme.
These elements can greatly influence the maze’s aesthetic appeal.
Complexity Levels of Design Elements
| Design Element | Complexity Level | Description |
|---|---|---|
| Straight lines | Beginner | Simple, easy to construct, provides a foundation for more complex patterns. |
| Curves | Intermediate | Incorporates a subtle degree of difficulty, requiring more precise placement of marbles. |
| Loops | Intermediate to Advanced | Creates challenges in navigation, requiring careful planning and execution. |
| Interconnected Networks | Advanced | Highly intricate and challenging, requiring extensive planning and a significant amount of time for construction. |
| Layered Marbles | Beginner to Advanced | Adds depth and visual interest, can be combined with any of the above elements. |
| Geometric Patterns | Beginner to Advanced | Offers structure and visual appeal, can be adapted to varying levels of complexity. |
Construction Methods
Building a captivating marble table maze involves careful planning, precise execution, and a touch of artistry. This section delves into the practical steps of construction, from initial layout to final assembly, emphasizing techniques for creating intricate curves and visually appealing pathways. Understanding the different methods for securing materials and crafting attractive borders will elevate your project from a simple game to a truly impressive work of art.
Initial Planning and Layout Transfer
Thorough planning is crucial for a successful table maze. Begin by sketching the desired maze design on paper, including all turns, curves, and pathways. Once satisfied with the design, carefully transfer the layout onto the table surface using a light pencil or erasable marker. This step ensures accuracy and allows for adjustments before committing to the construction process.
The layout should clearly define the boundaries of the maze, including the entrance and exit points.
Curve and Turn Creation Methods
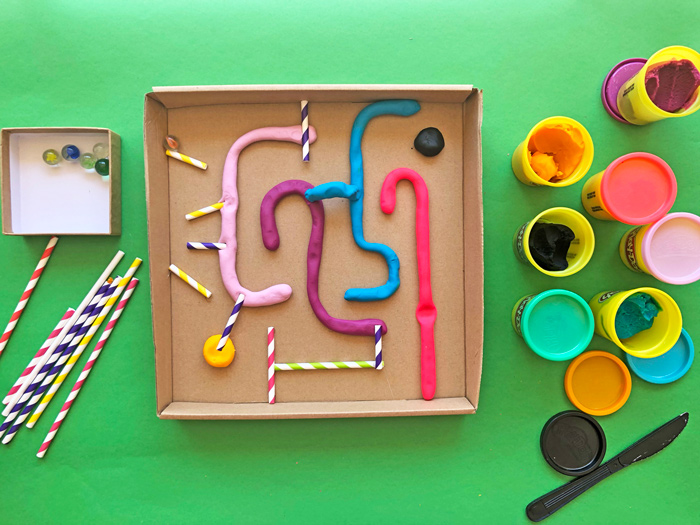
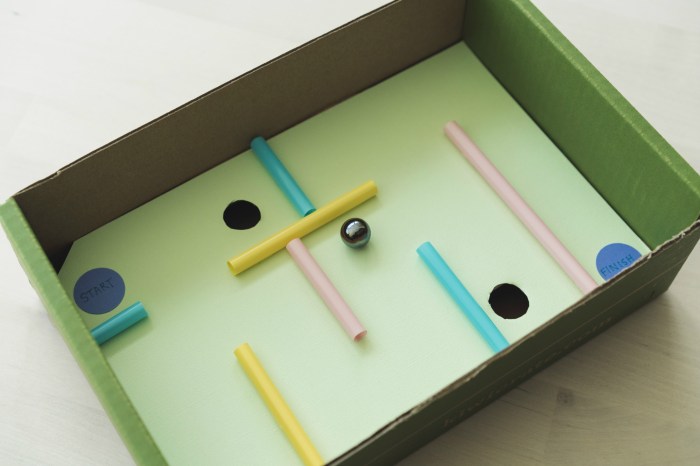
Various methods exist for shaping curves and turns in the marble maze. One common approach is to use pre-cut pieces of wood or acrylic to form the boundaries. These can be precisely shaped and joined to create complex curves, but may require careful measurement and cutting. Alternatively, you can use flexible materials like clay or modeling putty to sculpt the curves directly onto the table surface.
This method offers more freedom for design improvisation, but requires patience and precision in shaping.
Material Securing Techniques
Ensuring the stability and integrity of the maze is critical. For wooden or acrylic pieces, use strong, wood glue or construction adhesive, applying it generously to the contact points. Allow sufficient drying time according to the manufacturer’s instructions before proceeding. For flexible materials like clay, use a specialized adhesive designed for sculpting, ensuring proper adhesion without compromising the flexibility.
Consider using double-sided tape for smaller pieces or decorative elements, though this method might not be suitable for larger, more substantial components.
Border and Pathway Creation
Visually appealing borders and pathways enhance the aesthetic appeal of the table maze. Consider using contrasting colors of paint or markers to define the pathways and borders, creating a visually striking contrast. Using a stencil or templates for border designs can create consistent, repeating patterns, and elevate the overall appearance. For intricate borders, consider using small pieces of decorative tile or mosaic material.
These additions not only add visual interest but also enhance the tactile experience of the maze.
Safety Considerations
Building a marble DIY table maze is a fun and engaging project, but safety should always be a top priority. Proper precautions and material handling techniques are crucial to ensure a safe experience for everyone, especially if children are involved. This section Artikels potential hazards and strategies to minimize risks during the construction and use of the maze.
Potential Hazards
Several hazards can arise during the construction and use of a marble DIY table maze. Sharp edges from materials like wood or acrylic, improper use of tools, and inadequate support structures can lead to injuries. The small size of marbles and the intricate design of the maze can present choking hazards for young children. Incorrectly sealed surfaces or use of toxic glues can cause health problems.
Careless handling of materials like glass or heavy wood can cause accidental damage or breakage.
Safety Precautions and Measures
Implementing safety precautions is vital to prevent accidents. Use protective gear like safety glasses, gloves, and closed-toe shoes during construction. Ensure proper ventilation when using glues or paints. Use appropriate tool safety procedures and supervise children closely during all stages of the project. Store all materials and tools properly to prevent accidental injuries or damages.
Securely anchor the maze to the table or surface to prevent it from tipping over. Ensure that the maze is built on a stable surface and the supports are strong enough to hold the weight of the maze and potential marbles.
Material Handling Techniques
Careful handling of materials is critical to prevent damage and injuries. Use appropriate tools and techniques when cutting, shaping, and assembling the maze. For example, when working with wood, use a saw with a sharp blade and proper cutting techniques to prevent splinters. Use clamps to secure pieces of wood together to prevent them from shifting during assembly.
Handle glass or acrylic with care to avoid breakage. For heavy materials, use proper lifting techniques to avoid strain injuries.
Child-Proofing Strategies
Child-proofing strategies are essential to ensure the safety of children using the marble maze. Select materials that are non-toxic and smooth to the touch, avoiding sharp edges or corners. Choose child-safe glues and paints that are non-toxic and do not contain harmful chemicals. Use interlocking connectors or clips to join maze components rather than relying solely on glue.
Ensure the maze is sturdy enough to withstand the weight of children playing with it, preventing potential tipping hazards. Keep the maze away from high-traffic areas or places where children can easily bump into it. Cover or protect sharp edges and corners to prevent injuries.
Troubleshooting
Building a marble maze table can be a rewarding experience, but unforeseen challenges can sometimes arise. This section will equip you with the knowledge to identify and resolve common problems, ensuring a smooth construction process and a beautifully functioning maze. From material inconsistencies to structural issues, we’ll cover it all, enabling you to confidently tackle any obstacles that may appear.Troubleshooting a DIY project is crucial for maintaining quality and preventing frustrating setbacks.
By understanding potential problems and their solutions, you can avoid costly rework and ensure your marble maze table is both functional and aesthetically pleasing.
I’ve been obsessed with YouTube marble DIY table mazes lately. The intricate designs and satisfying sound of marbles rolling are so captivating. It got me thinking about other captivating visuals, like the upcoming Akira Toriyama sand land animated movie, Akira Toriyama sand land animated movie bandai namco , and how the artistry in both could inspire similar, elaborate marble maze designs.
I’m already sketching out some new ideas for my next YouTube marble maze build!
Common Construction Issues
Addressing potential problems proactively is key to a successful project. Careful planning and preparation can significantly reduce the likelihood of encountering issues during construction. Identifying and resolving these problems early on will save you time and frustration.
- Uneven Surfaces: Ensure the base and any supporting structures are perfectly level. Use a spirit level to check for evenness. If surfaces are uneven, use shims or leveling materials to create a consistent plane for the maze.
- Material Cracks or Breaks: Marble, especially when cut or shaped, is susceptible to cracks. If a piece breaks, carefully evaluate the damage. If possible, repair the crack using epoxy resin specifically designed for stone or marble. Match the color of the epoxy to the marble for a seamless repair. If the damage is extensive, consider replacing the broken piece.
- Incorrectly Cut Marble Pieces: Accurate cuts are vital for a smooth and seamless maze. If cuts are off-center or misaligned, use a saw or other precision cutting tool to make corrections. Ensure the cut edges are smooth to prevent the marbles from getting stuck. Consider using a sanding block or wet-sanding technique to achieve a polished finish.
- Glue Issues: Glue failures can lead to loose components or even complete collapse. Verify the glue type is suitable for marble. Ensure a clean surface to ensure proper bonding. Apply a thin, even layer of glue. If glue is not bonding properly, consider using a different type of glue or adjusting the application method.
Repairing Structural Defects
Repairing structural defects in the table maze requires careful attention to detail and the use of appropriate materials. Knowing the right techniques can transform a damaged structure into a strong and stable component.
- Loose Connections: If any part of the maze is loose, examine the connection points. Tighten any screws or bolts as needed. If the connection points are damaged, reinforce them with epoxy or a similar strong adhesive.
- Warped Surfaces: Warped or bent surfaces can disrupt the flow of the marble through the maze. Use clamps or other supports to carefully straighten the affected area. Apply epoxy or resin to reinforce the structural integrity of the warped area. If the warping is significant, consider replacing the affected component.
Resolving Material Issues
Material issues during construction can cause significant problems. Addressing them promptly will prevent major setbacks.
- Uneven Marble Thickness: Variations in marble thickness can affect the flow of the marbles through the maze. If some pieces are noticeably thicker or thinner, consider replacing or reshaping the uneven pieces. This will ensure a consistent marble path.
- Color Variations: Marble often exhibits color variations. If color inconsistencies are noticeable, plan your layout to minimize the impact of these variations. Using contrasting colors can create visual interest. Try to match the color of replacement pieces to existing pieces for a consistent aesthetic.
Visual Presentation
Bringing your DIY marble table maze to life on YouTube requires a polished visual presentation. High-quality images and videos are crucial for captivating viewers and demonstrating your craftsmanship. This section will delve into effective photography and videography techniques, lighting strategies, and video editing best practices for creating a compelling YouTube experience.

High-Quality Photography and Videography
Thorough preparation and attention to detail are key to capturing the intricate beauty of your table maze. Use a high-resolution camera or smartphone capable of capturing sharp details. Positioning the camera at a slightly elevated angle often enhances the perspective and provides a better overall view of the maze’s design. Consider using a tripod for stability, especially when capturing multiple shots for a video.
Lighting is paramount; natural light or well-positioned artificial lighting is essential for showcasing the depth and textures of the maze.
Lighting Techniques for Capturing Intricacies
Proper lighting is essential for highlighting the details of your marble table maze. The following table compares different lighting techniques:
| Lighting Technique | Description | Pros | Cons |
|---|---|---|---|
| Natural Light (Sunlight) | Utilizing natural light from a window or outdoor setting. | Creates a warm, ambient atmosphere, often free of harsh shadows. | Dependent on weather conditions, can be inconsistent, and may require adjusting for different times of day. |
| Softbox Lighting | Using softboxes to diffuse light, reducing harsh shadows and creating a uniform illumination. | Produces soft, even light, minimizing shadows and maximizing detail. | Can be more expensive and require more setup time. |
| LED Panel Lighting | Using LED panels to provide consistent, controllable lighting. | Provides adjustable color temperature and intensity, allowing for precise control over the lighting environment. | Can be more expensive than other options but is more flexible. |
| String Lights | Using string lights to add a touch of ambiance and highlight specific areas. | Creates a visually appealing glow, particularly useful for night-time or evening shots. | May not be ideal for capturing all details due to potential glare or reflections. |
Effective Video Editing Techniques for YouTube
Engaging video editing is vital to transforming static images into a dynamic and captivating experience. Using transitions like fades, wipes, or cross-dissolves can smoothly connect different shots and add visual interest. Music and sound effects enhance the overall experience, creating a more immersive atmosphere. Keep the editing pace engaging, avoiding excessive slow-motion or overly long cuts that could distract viewers.
Video Script Structure for YouTube
A well-structured script is crucial for a successful YouTube video. The structure should include:
- Introduction (0-30 seconds): Briefly introduce the project and its significance. Emphasize the creativity and effort involved in constructing the maze.
- Materials and Tools (30-60 seconds): Showcase the materials and tools used, providing a brief overview of their roles.
- Design and Layout (60-90 seconds): Present the design process and layout decisions, emphasizing the inspiration behind the maze’s structure.
- Construction Methods (90-120 seconds): Clearly demonstrate the step-by-step construction process, highlighting key techniques and considerations.
- Troubleshooting and Tips (120-150 seconds): Share common problems encountered and offer solutions. Offer valuable tips to aid viewers.
- Conclusion (150-180 seconds): Summarize the project’s completion and provide a final appeal to viewers to like, subscribe, and comment.
Tips and Tricks
Creating a mesmerizing marble maze isn’t just about the design; it’s about the execution. These tips and tricks will streamline your construction process, help you overcome potential challenges, and ultimately create a table maze that’s both visually stunning and engaging for your audience. Efficient techniques and thoughtful design choices will greatly impact the overall experience.
Pre-Construction Planning
Careful planning before starting construction is crucial for a smooth process. This involves not just visualizing the maze layout but also anticipating potential challenges and having solutions ready. A well-defined plan will prevent costly mistakes and ensure a more enjoyable experience.
- Material Inventory: Create a detailed list of all materials needed. This avoids the common pitfall of running out of crucial components mid-construction. Measure your chosen materials meticulously to avoid wasting time or resources on unsuitable or incorrectly sized pieces.
- Modular Design: Consider constructing the maze in smaller, manageable modules. This allows for easier assembly and modification during the construction process. It also aids in identifying and rectifying errors within a smaller, more contained section before moving on.
- Trial Runs: Before finalizing the construction, practice with marbles on a mock-up or smaller section of your design. This allows for a thorough assessment of the flow and effectiveness of the maze. This practice session reveals potential blockages or unexpected paths that the marbles might take.
Construction Techniques
Efficient construction methods will significantly impact the final outcome. Applying these techniques will ensure a smooth and satisfying construction process.
- Precise Cutting: Use precise tools for cutting materials. Accuracy in cutting components ensures the maze’s design integrity and prevents issues with fit and alignment. Sharp blades or specialized cutting tools are essential for achieving clean and precise cuts.
- Secure Connections: Employ strong and reliable adhesives or fasteners to secure components. This prevents slippage or detachment during the construction process. Using appropriate glue for the chosen materials ensures structural integrity and prevents movement or deformation over time.
- Reinforcement Strategies: Reinforce critical junctions or areas prone to stress. This might involve adding extra supports or reinforcing materials to ensure the structural integrity of the maze. This is especially important in areas with sharp turns or where the maze changes direction dramatically.
Engaging Design Elements
Adding unique elements and visual appeal will transform your marble maze from a simple project to an engaging experience.
- Visual Cues: Incorporate visual cues or markers to guide the marble’s path. This can be subtle color variations, strategically placed objects, or textured surfaces. This not only adds visual interest but also makes the maze more intuitive for the marbles.
- Interactive Features: Integrate interactive elements to elevate the maze. This could involve incorporating hidden compartments, miniature sculptures, or even a small, controlled water feature. This enhances the maze’s allure and encourages further exploration.
- Theme Integration: Choose a theme that complements your maze design. This could be a fantasy landscape, a futuristic city, or even a whimsical woodland scene. Integrating a theme into the maze enhances the visual appeal and creates a more immersive experience.
Troubleshooting and Refinement, Youtube marble diy table maze
Addressing potential issues early will help maintain a positive experience.
- Path Analysis: Thoroughly analyze the marble’s path to identify any potential blockages or areas where the marble might get stuck. This analysis ensures the maze is functional and provides an enjoyable experience for the marble.
- Material Adjustments: If necessary, adjust the materials or their arrangement to improve the maze’s functionality. This might involve adding or removing materials or altering the design of specific sections. This iterative process ensures a smooth and satisfying experience for the marble.
- Final Polishing: Once the maze is complete, apply a finishing touch to enhance its aesthetic appeal. This could involve applying a protective coating, adding decorative elements, or even carefully placing small embellishments.
Variations and Alternatives

Beyond the basic marble maze, the possibilities for DIY table mazes are vast. Exploring different materials, construction methods, and design elements allows for a unique and personalized project. This section dives into the exciting world of variations and alternatives, offering inspiration for crafting a maze that truly stands out.Expanding on the fundamental concepts, we can now consider the scope of materials, methods, and designs.
This will enable a deeper exploration of the design space, moving beyond the initial design concepts.
Material Variations
Different materials offer varying levels of challenge, aesthetics, and durability. Marble is a classic choice, but other materials can be equally effective. Glass, acrylic, or even wood can create striking mazes. The choice of material significantly impacts the construction methods and the overall look. Consider the desired visual appeal, the budget, and the level of complexity when selecting your material.
- Glass: Glass offers a transparent and elegant look, allowing for intricate designs to be seen through the material. However, glass can be more fragile and more challenging to work with, requiring precision cuts and potentially specialized tools. Examples include a maze carved into thick glass sheets or a series of glass tubes.
- Acrylic: Acrylic sheets provide a less expensive alternative to glass. They are lightweight, yet durable enough for a maze, and come in a variety of thicknesses. They can be cut with standard craft tools. Consider using different shades of acrylic to create depth and visual interest in your maze.
- Wood: Wood provides a warm, natural aesthetic. You can carve or shape the wood to create complex pathways. Consider using different wood types, such as stained or painted wood, to achieve varied colors and textures.
- Cardboard: For a budget-friendly option, cardboard can be cut and assembled to create a maze. It is easily customizable, and the lightweight nature is perfect for tabletop projects. However, cardboard mazes might not be as durable or long-lasting as mazes made from other materials.
Alternative Table Surfaces
Not all table surfaces are suitable for a marble maze. Consider the stability, durability, and the surface’s ability to support the weight of the maze.
- Glass Tables: Glass tables offer a clean and modern aesthetic. They provide a smooth surface for the maze components to rest on. Ensure the glass is thick enough to support the maze structure without cracking or shattering under pressure.
- Wood Tables: Wood tables can also work well, especially if the surface is smooth and even. A clear, protective coating may be necessary to prevent damage or staining from the maze components.
- Acrylic Tables: Similar to glass tables, acrylic tables provide a smooth surface. Their lightweight nature makes them suitable for various maze configurations.
- Metal Tables: Metal tables, particularly those with a smooth surface, could be used. However, the metal’s conductivity might require extra consideration for certain maze components.
Construction Method Comparisons
The construction methods vary depending on the chosen material.
| Material | Construction Method |
|---|---|
| Marble | Precise cutting and shaping of marble slabs or tiles. |
| Glass | Precise cutting and assembling of glass pieces, possibly with specialized tools for precise cuts. |
| Acrylic | Cutting and assembling of acrylic sheets using standard craft tools. |
| Wood | Carving, shaping, or assembling wooden pieces. |
| Cardboard | Cutting and assembling cardboard pieces, often using glue or tape. |
Incorporating Additional Elements
Beyond the maze itself, consider adding elements to enhance the experience.
- Decorative elements: Incorporate small figurines, pebbles, or other decorative objects to enhance the visual appeal and make the maze more engaging. This could be tiny animals or vehicles placed within the maze pathways.
- Lighting: LED lights can create an enchanting ambiance within the maze, highlighting the intricate pathways and creating a mesmerizing effect. LED strip lights along the edges or within the maze can provide a captivating glow.
- Sound: Add subtle sound effects to create an immersive experience. Small speakers or chimes can be integrated to provide a more dynamic and engaging atmosphere. This could be soft music or ambient sounds.
Outcome Summary
In conclusion, building a YouTube marble DIY table maze is a rewarding journey that combines creativity, craftsmanship, and visual storytelling. This comprehensive guide has covered the crucial steps from materials and design to construction, safety, and presentation. By following the tips and tricks provided, you’ll be well-equipped to create a compelling video that will impress your viewers and ignite their own creative passions.
Now go forth and craft your masterpiece!