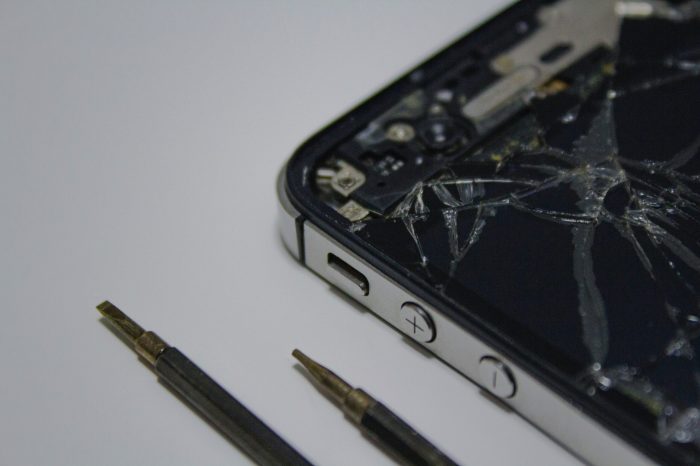
i fixed my broken iphone screen using apples self service repair kit, a DIY project that might surprise you. This guide walks you through the entire process, from unboxing the kit to successfully installing the new screen. We’ll cover essential safety precautions, detailed step-by-step instructions, and troubleshooting common problems. It’s not as scary as it sounds!
Imagine the satisfaction of fixing your own device and saving money. This guide will equip you with the knowledge and confidence to tackle this repair, ensuring a successful outcome. We’ll break down the process into manageable steps, providing clear instructions and helpful visuals. Get ready to dive into the world of DIY phone repair!
Introduction to DIY iPhone Screen Repair
Taking the initiative to repair your broken iPhone screen yourself using Apple’s self-service repair kit can be a cost-effective and empowering solution. This process allows you to tackle the repair at your own pace and in your own environment, offering a significant advantage over professional repair shops. However, it’s crucial to understand the steps involved, potential challenges, and risks before embarking on this endeavor.
Unboxing and Preparation
Before you begin, carefully review the contents of the repair kit. This kit usually includes specialized tools, adhesive, and replacement parts specifically designed for your iPhone model. Ensure all necessary components are present and in good condition. Thoroughly inspect the damaged screen to identify any cracks or debris that might hinder the repair process.
Disassembly and Component Removal
The process involves carefully separating the various layers of the iPhone’s display assembly. Specific tools are needed for this, and improper handling can lead to damage to the device. Following the detailed instructions provided in the repair kit is crucial for successful disassembly. Start by disconnecting the various cables and components that connect the display assembly to the motherboard.
Installation of the New Screen
The replacement screen, already prepared within the kit, requires precise application of the adhesive provided. Align the new screen carefully with the surrounding frame and ensure proper contact with the underlying components. Adherence to the recommended application instructions is essential to prevent air bubbles and ensure a secure bond. Take your time to align the screen components correctly to ensure a snug fit and minimize the risk of air bubbles.
Reassembly and Testing
Once the new screen is in place, carefully reassemble the various components, connecting cables, and securing them properly. Pay attention to the orientation and placement of each part, ensuring that everything is connected correctly. Power on the iPhone and test the functionality of the new screen to confirm a successful repair. Thorough testing is critical to ensure the display operates as expected.
Tools and Materials
The necessary tools and materials vary based on the specific model of iPhone and the repair kit. Commonly required tools include precision screwdrivers, suction cups, plastic opening tools, and a microfiber cloth. The repair kit typically includes all necessary tools and materials.
Potential Challenges and Risks
While DIY repair can be rewarding, there are potential challenges and risks. Improper handling of the device or tools can lead to further damage. Incorrect installation of the replacement screen may result in issues with functionality or durability. Following the instructions meticulously is essential to minimize these risks.
Cost Comparison: Professional vs. DIY
| Aspect | Professional Repair | DIY Repair |
|---|---|---|
| Cost of Repair | $100-$200 (estimated) | $50-$100 (kit cost + potential material costs) |
| Time Investment | 1-2 hours (estimated) | 2-4 hours (estimated) |
| Risk of Further Damage | Low | Medium |
| Expertise Required | High | Medium |
This table provides a general comparison, and actual costs may vary depending on the specific iPhone model, the repair shop, and the complexity of the damage. DIY repair can be a cost-effective alternative to professional repair, but it requires careful planning and execution.
Fixing my cracked iPhone screen with Apple’s self-service repair kit was surprisingly straightforward. It’s a testament to how much Apple prioritizes user-friendliness in repairs, unlike some cybersecurity companies like palo alto networks and trustwave who sometimes struggle with complex configurations. The whole process was definitely more satisfying than I anticipated, and I’m glad I went the DIY route.
It was a great way to save some money and get back to using my phone without delay.
Preparation and Safety Procedures
Before diving into the intricate world of iPhone screen repairs, meticulous preparation and adherence to safety protocols are paramount. A well-organized workspace and the right protective gear can significantly reduce the risk of damaging your device further or injuring yourself. Understanding these procedures will ensure a successful and safe repair process.
Essential Safety Precautions
Prioritizing safety is crucial during any DIY repair project. Ensure you have a well-lit and clutter-free workspace to avoid accidents. Avoid working in dusty or humid environments, as these conditions can negatively affect the repair process and compromise the integrity of the components. Proper ventilation is important for a safe environment.
So, I finally tackled that cracked iPhone screen! Using Apple’s self-service repair kit was surprisingly straightforward. Now, I’m ready to dive back into some mobile gaming, and luckily, Fortnite Battle Royale is available for iOS mobile via Epic Games! fortnite battle royale ios mobile epic games available now download. I’m excited to finally play it again, and now my phone is looking and working great, thanks to the easy repair process.
Workspace Setup and Environmental Control
Creating an ideal workspace is critical for a successful repair. Choose a stable, well-lit surface, ideally a sturdy table or workbench. Clear the area of any unnecessary items to prevent tripping hazards or accidental damage. Maintain a controlled environment, avoiding extreme temperatures or humidity. Use a soft, lint-free cloth to avoid scratches.
Protective Gear
Appropriate protective gear is essential to safeguard your health and the integrity of your iPhone during the repair process. Wear safety glasses or goggles to protect your eyes from debris. Use gloves to prevent accidental scratches or damage to the screen and other components. A clean workspace will help prevent further issues.
Preparing the iPhone for Repair
Properly preparing the iPhone before disassembling it is crucial for a successful repair. This involves a series of steps that minimize the risk of damaging the device further. These steps must be followed meticulously to avoid damaging the phone.
- Power Down and Disconnect: Turn off the iPhone and disconnect any connected accessories. This step is critical to prevent electrical damage and ensure a safe repair process.
- Clean the Screen: Gently clean the iPhone screen using a soft, lint-free cloth and a specialized screen cleaning solution. This step removes any debris that may interfere with the repair process. Avoid using harsh chemicals.
- Static Protection: Ground yourself before handling any internal components to discharge static electricity, which can damage sensitive parts. This is a vital step to avoid potential electrical damage.
- Documentation: Take detailed photographs or videos of the iPhone’s disassembled state during the process. This will act as a visual guide for reassembly and help troubleshoot any issues during the process.
Disassembly Order Procedure
Following a systematic disassembly order is vital for preventing damage and ensuring a smooth reassembly. This table illustrates the correct order of disassembling steps for an iPhone screen repair. The correct order is crucial to prevent damage.
| Step | Action |
|---|---|
| 1 | Remove the back panel and battery. |
| 2 | Disconnect the logic board connectors. |
| 3 | Remove the display assembly frame. |
| 4 | Detach the display cable. |
| 5 | Carefully separate the display from the phone. |
Disassembly and Component Replacement
Now that you’ve prepped your iPhone and have the necessary tools, let’s dive into the heart of the repair: disassembling and replacing the screen assembly. This section provides a detailed guide to ensure a safe and successful outcome. Remember, precision and care are paramount during this process. Any force applied incorrectly could damage the delicate components, negating your efforts.
Disassembling the iPhone Screen Assembly
The iPhone screen assembly is a complex system of interconnected components. Careful attention to each step is critical to prevent damage. Each component has a specific function and location, and improper removal could lead to issues with the display, touch responsiveness, or even further damage to the phone.
- Initial Steps: Begin by removing any protective films or adhesive residue. Use a soft, lint-free cloth and a gentle, upward motion to prevent scratching. Using a suction cup or a specialized tool, gently lift the display panel from the frame.
- Carefully Separating Components: Next, you’ll encounter adhesive layers securing the screen to the frame. Use specialized tools or a precision plastic opening tool to carefully pry open these adhesive layers. This requires a methodical approach, and the tools need to be applied with precise pressure to avoid damaging the screen or frame.
- Removing the Display Cable: With the adhesive layers loosened, you will need to detach the display cable from the logic board. This is a delicate procedure; use tweezers or a specialized tool to carefully disconnect the cable connectors. Take care not to bend or damage the cable, as this could lead to display issues or even complete failure of the display.
- Removing the Touch Screen: Once the display cable is disconnected, you’ll need to carefully remove the touch screen assembly. Often, there are additional adhesive layers securing this assembly to the display. Use the same precision tools as before to release the touch screen from the display.
- Removing the Digitizer: The digitizer is the component that processes touch input. Carefully remove this component from the touch screen assembly, using a combination of prying tools and precision. Use a flat-edged tool to release any remaining adhesive.
Replacing the New Screen Assembly
Replacing the new screen assembly is a reversal of the disassembly process. Precision and attention to detail are crucial in this step. Incorrect installation can lead to performance issues and damage to the phone.
- Securing the Digitizer: Carefully position the new digitizer onto the touch screen assembly. Ensure it is aligned correctly with the touch screen. Press firmly, but not excessively, to secure it. Use a specialized tool or your fingers to ensure the digitizer is firmly and properly aligned.
- Installing the Touch Screen: Carefully position the new touch screen assembly onto the display. Ensure it is aligned correctly with the display and that the adhesive layers are properly positioned. Press firmly, but not excessively, to secure it.
- Connecting the Display Cable: Carefully reconnect the display cable to the logic board. Ensure that the connectors are aligned properly and fully connected. A slight misalignment can cause display issues.
- Reattaching the Display Panel: Carefully align the new display panel to the frame. Apply the new adhesive strips, ensuring they are evenly distributed and properly aligned. Use the appropriate tools to press firmly on the display to secure it. Be mindful of the pressure applied. Too much pressure could damage the screen.
- Final Assembly: Once the display panel is secured, carefully put the phone back together, ensuring all components are correctly aligned and in their proper position. Pay close attention to the adhesive and ensure it’s properly adhered to the frame.
Parts of the Screen Assembly
| Part | Description |
|---|---|
| Display Panel | The visible screen portion |
| Touch Screen | The component that detects touch input |
| Digitizer | Processes the touch input data |
| Display Cable | Connects the display panel to the logic board |
| Adhesive Layers | Secure the components to the frame |
Reassembly and Testing: I Fixed My Broken Iphone Screen Using Apples Self Service Repair Kit
Putting your iPhone back together after a screen repair might seem daunting, but with careful attention to detail, it’s a manageable process. This section details the precise steps for reassembling your iPhone and thoroughly testing the repaired screen to ensure a successful outcome. Following the instructions meticulously is crucial to prevent further damage and ensure optimal functionality.Thorough reassembly and rigorous testing are vital to the success of the repair.
A checklist of steps, along with troubleshooting guidance, ensures the integrity and reliability of the repaired iPhone. Understanding the importance of proper component placement and the steps to conduct thorough tests will ensure the iPhone functions correctly.
Reassembly Procedure
The reassembly process requires precision and care. Each component must be placed correctly to avoid malfunctions. Start with the smaller, more delicate parts, ensuring no pressure is applied to any newly installed components. This meticulous approach is essential for a successful repair. Adhering to the sequence Artikeld in the repair kit instructions is critical for optimal results.
Component Verification Checklist
A meticulous checklist ensures that all components are correctly placed and functioning. This is vital to the successful operation of the repaired iPhone. Ensuring every part is properly aligned and connected will prevent issues.
- Verify the display cable is securely connected to the logic board and display assembly.
- Confirm the adhesive is properly applied to the display assembly and frame.
- Ensure all screws are tightened to the correct torque, following the instructions in the repair kit.
- Check for any trapped debris or dust particles.
- Double-check the alignment of the home button, volume buttons, and other external components.
Thorough Screen Test
A comprehensive test ensures the repaired screen functions as intended. This process should encompass various scenarios to validate the screen’s performance and identify potential issues. This thorough testing will confirm the effectiveness of the repair.
- Check for responsiveness across the entire screen. Tap on different parts of the screen to ensure smooth and quick responses. Verify that the screen reacts accurately to touches and inputs.
- Test the display’s backlight and brightness. Adjust the brightness levels to ensure a uniform illumination across the entire screen. Examine the screen’s color accuracy and uniformity.
- Verify the functionality of the touch screen, including scrolling, pinch-to-zoom, and other gestures. Ensure that the screen accurately registers all input actions.
- Run various apps and games to test the display’s performance under different conditions. Pay attention to how the screen handles dynamic content and transitions.
- Observe the screen under different lighting conditions. Examine the clarity and sharpness of the display in various light settings.
Troubleshooting Common Issues
Troubleshooting potential issues after reassembly is crucial. This section provides guidance to address common problems that might arise.
- Black Screen: If the screen remains black, check the display cable connections, ensure the adhesive is correctly applied, and verify that the logic board is properly connected. Also, check if the display is properly seated in the frame.
- Touch Issues: If the touch screen is unresponsive or inaccurate, carefully examine the connections to the logic board, verify the adhesive is correctly placed, and ensure no dust particles are trapped between the display and frame.
- Flickering or Ghosting: These issues often point to a problem with the display cable or connections. Ensure the display cable is securely connected and there are no obstructions or damage.
Reassembly and Testing Summary
| Step | Description |
|---|---|
| Reassembly | Follow the repair kit instructions meticulously, starting with smaller components. Securely attach all parts, paying attention to alignment. |
| Component Verification | Check all connections, ensure proper alignment, and tighten screws according to instructions. Verify the adhesive is applied correctly. |
| Screen Test | Thoroughly test screen responsiveness, backlight, brightness, touch functionality, and performance under various conditions. |
| Troubleshooting | Address common issues like black screens, touch problems, or flickering. Check connections, ensure proper placement, and remove any debris. |
Troubleshooting and Common Problems

Repairing your iPhone screen yourself can be rewarding, but it’s essential to be prepared for potential issues. Knowing what to look for and how to troubleshoot problems will help you avoid frustration and get your phone back to working order. This section will cover common problems encountered during the repair process, and how to address them effectively.Understanding the potential pitfalls and troubleshooting strategies beforehand significantly increases your chances of success.
This section details the common problems and provides actionable solutions, allowing you to navigate any roadblocks encountered during your DIY repair journey.
Finally fixed my cracked iPhone screen using Apple’s self-service repair kit! It was surprisingly straightforward, and way cheaper than taking it to a shop. Speaking of which, the way kids use memes these days is seriously melting my brain; the way kids use memes is melting my brain is a great example of how quickly things evolve.
Anyway, I’m pretty happy with how easy it was to get my phone back up and running again.
Potential Issues During Disassembly
Improper handling during the disassembly stage can lead to damage to internal components. Carefully following the step-by-step instructions and using the appropriate tools are crucial. Static electricity can also affect the delicate components within the phone, so working in a well-grounded environment and using anti-static wrist straps are recommended. Using excessive force can also damage components, so always be mindful of applying gentle pressure during the disassembly process.
Common Problems During Component Replacement
Incorrect component alignment is a frequent issue. Precise placement is essential for proper functionality. Using the provided diagrams and taking your time to ensure proper alignment are vital steps to avoid this problem. Another common issue is damaging the adhesive during re-application. Using the right amount of pressure and avoiding excessive heat or cold are crucial factors to consider.
Adhering to the provided instructions and using the correct tools minimizes the risk of damage.
Troubleshooting Component Malfunction, I fixed my broken iphone screen using apples self service repair kit
If a component appears faulty, careful examination is necessary. A common reason for malfunction is a damaged or incorrectly connected cable. Visual inspection and comparison with the original component can identify the problem. Sometimes, a component might be loose, which can be resolved by gently re-securing it with the appropriate tools. Using magnifying glasses or microscopes during the troubleshooting process can be very useful to identify the issues.
Preventing Potential Issues
Following the instructions carefully is paramount. Always ensure that you have a well-lit workspace and that the tools are clean and in good condition. Use anti-static precautions to prevent damage from static electricity. Using the correct tools and techniques will minimize the risk of damaging any components during the repair process.
Table of Common Problems and Solutions
| Problem | Solution |
|---|---|
| Component misalignment | Carefully follow diagrams and ensure precise placement. Take your time. |
| Damaged adhesive | Use the correct amount of pressure and avoid excessive heat or cold. |
| Component malfunction (e.g., loose cable) | Inspect for damage or loose connections. Re-secure with appropriate tools. |
| Static electricity damage | Work in a well-grounded environment and use anti-static wrist straps. |
| Incorrect tool usage | Ensure you are using the correct tools for the task. Double-check instructions. |
Post-Repair Care and Maintenance
Congratulations on completing your iPhone screen repair! Taking proper care of your newly repaired device is crucial to ensuring its longevity and preventing further issues. This section details the essential steps for post-repair maintenance, troubleshooting, and warranty considerations.A well-maintained iPhone screen repair will last longer and function optimally. This includes paying attention to handling, environmental factors, and recognizing signs of potential problems.
By understanding these aspects, you can minimize the risk of issues arising from the repair itself.
Importance of Proper Post-Repair Care
Proper post-repair care significantly impacts the longevity and functionality of your repaired iPhone. Ignoring these steps could lead to further damage or compromise the effectiveness of the repair. This includes avoiding harsh impacts and extreme temperatures. Taking precautions can prevent future problems and maintain the device’s performance.
Maintaining Your Repaired iPhone
Maintaining a repaired iPhone involves several key practices. Careful handling and protection are essential to prevent accidental damage.
- Handle your iPhone with care, avoiding dropping or placing heavy objects on it. Use a protective case and screen protector to shield it from everyday wear and tear.
- Avoid exposing your iPhone to extreme temperatures, direct sunlight, or moisture. These conditions can impact the adhesive used in the repair and compromise its integrity.
- Regularly clean your iPhone screen using a soft, lint-free cloth and a screen cleaning solution. Avoid harsh chemicals or abrasive materials that could scratch the screen or damage the repair.
- Be mindful of charging habits. Do not leave the phone plugged in for extended periods, especially if it’s not in use. This can lead to overheating and potentially harm the repair.
Troubleshooting a Failed Repair
If you encounter problems after the repair, such as a recurring issue with the screen, it’s essential to systematically troubleshoot the problem.
- Check for physical damage. If the screen shows new cracks or other damage, contact the repair technician or Apple Support.
- Inspect the adhesive. Look for signs of peeling or separation between the screen and the frame. This might indicate a problem with the bonding process.
- Assess functionality. Ensure all screen functionalities, such as touch responsiveness, brightness, and color accuracy, are working as intended.
- Consult the repair technician or Apple Support if the issue persists after the troubleshooting steps. They may offer further assistance or recommend additional steps.
Warranty Coverage for Self-Service Repairs
Understanding your warranty coverage is crucial. Apple’s warranty policy may or may not cover self-service repairs, depending on the specific circumstances.
Apple’s official policy on self-service repairs is limited.
Contact Apple Support or the retailer that provided the repair kit for specific information on warranty coverage. Often, if the issue arises from improper handling or external factors after the repair, it might not be covered.
Recommended Maintenance Practices
The following table summarizes recommended maintenance practices for your repaired iPhone.
| Maintenance Practice | Description |
|---|---|
| Careful Handling | Avoid dropping or placing heavy objects on the device. Use a protective case. |
| Temperature Control | Avoid extreme temperatures and direct sunlight. |
| Cleaning | Regularly clean the screen with a soft cloth and screen cleaning solution. |
| Charging Habits | Do not leave the phone plugged in for extended periods when not in use. |
Illustrative Examples and Visual Aids
Visual aids are crucial for understanding and executing any repair process, especially intricate ones like iPhone screen replacements. Detailed images and step-by-step instructions make the process far less daunting and significantly increase the likelihood of a successful repair. This section provides a visual journey through the repair process, highlighting tools, components, and potential issues.Visual demonstrations and diagrams make the repair process much easier to follow, ensuring a successful outcome.
They allow for a better understanding of the specific steps and the delicate nature of the components involved, thus reducing the risk of damage during the repair.
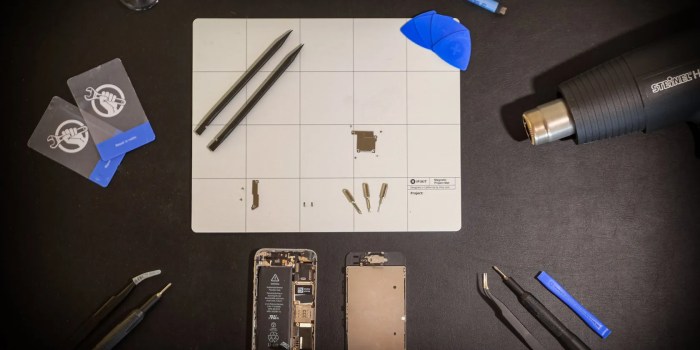
Tools and Component Identification
Visual representation of tools and iPhone components is paramount for successful repair. This section presents detailed images and descriptions of each tool and component, helping users identify them with accuracy.
- A close-up image of the precision spudger tool, highlighting its thin, pointed tip and the precision required for delicate component separation. The spudger is essential for carefully prying apart the adhesive layers holding the display assembly to the phone’s frame.
- An image of the suction cup tool, showcasing its design for creating a secure vacuum seal on the phone’s display. The suction cup is vital for gently lifting the display from the phone’s frame. Note the importance of using gentle pressure to avoid damage.
- A picture of the plastic opening tools and their various shapes. The tools are used for carefully opening the phone’s frame without damaging any internal components. The image will showcase different types of plastic opening tools for specific areas of the iPhone, with labels indicating their respective uses.
Disassembly Stage Illustrations
Accurate representation of the iPhone’s internal structure during the disassembly process is essential for understanding the procedure. The following visuals detail the iPhone’s interior, emphasizing the delicate handling needed at each stage.
- A detailed image of the iPhone’s back cover, showing the adhesive strips holding it in place. The image should clearly highlight the placement of these strips and the direction in which the tool should be applied during removal, highlighting the necessity of precision and care.
- An image of the display assembly, separated from the phone’s frame, but still attached to the internal components. The image will show the delicate connections and the careful method for disconnecting them. Highlighting potential points of damage and the importance of using the correct tools for this process is crucial.
- A clear image of the battery and its connector, illustrating the steps involved in safely disconnecting it from the logic board. This image should highlight the importance of identifying and disconnecting the battery safely to prevent short circuits and other potential damage.
Component Replacement Visuals
Accurate depiction of component replacement is vital for successful repair. This section offers detailed images illustrating the procedure.
- An image showing the new display assembly, highlighting the correct orientation for installation. The image will show the components and the order of reconnection.
- A step-by-step sequence of images demonstrating the process of reattaching the display assembly using the adhesive strips. The image sequence should show how to properly align the display and apply the adhesive with precision to ensure a secure and functional connection.
Troubleshooting Scenarios
Visual representation of potential problems is helpful in understanding the repair process. This section provides visual examples of various issues.
| Scenario | Visual | Description |
|---|---|---|
| Stuck display connector | Image of a display connector that is difficult to detach, showing the use of a spudger tool in a precise manner. | A visual demonstration of a common issue during disassembly. The image should clearly show the tool used to gently and precisely separate the connector. |
| Cracked adhesive strips | Image of adhesive strips showing signs of damage. | The image highlights the importance of using the correct tools to avoid damaging the adhesive during removal and installation. |
| Incorrect component installation | Image showing a component improperly installed. | The image should highlight the correct placement of the component, showcasing the necessity of following instructions precisely. |
Final Summary
Successfully repairing your iPhone screen with Apple’s self-service kit can save you a significant amount of money and frustration. This comprehensive guide provided a detailed overview of the process, equipping you with the knowledge to handle the task safely and efficiently. Remember, careful preparation and adherence to the steps are crucial for a smooth and successful repair. We hope this guide has inspired you to take on your next DIY project!