Microsoft windows 11 screen recorder snipping tool – Microsoft Windows 11 Screen Recorder & Snipping Tool: Unlocking the power of screen recording and quick screenshots on your Windows 11 device. This comprehensive guide dives deep into the functionalities of both tools, from basic usage to advanced techniques, including comparisons with third-party alternatives. Learn how to capture your screen, annotate screenshots, and record videos with ease.
Whether you need to create tutorials, share important information, or troubleshoot technical issues, this guide will equip you with the knowledge and skills to master screen recording and snipping within Windows 11.
Introduction to Windows 11 Screen Recording and Snipping Tool
Windows 11 offers robust screen recording and capturing capabilities, enhancing productivity and communication. This versatile system allows users to record their screen activity, including audio, and create quick screenshots. The Snipping Tool, a built-in utility, provides a simple yet powerful way to capture specific portions of the screen. This exploration delves into the core functionalities of both, highlighting their differences and use cases.The integration of these tools into the Windows 11 operating system simplifies the process of creating visual content and sharing information.
The Snipping Tool in Windows 11 is a handy little utility, but sometimes you need more. For example, capturing gameplay footage of a game like Wii U RPG Xenoblade Chronicles X requires a more robust tool. Ultimately, the Snipping Tool is still a great option for quick screen grabs, but for complex video recordings, you’ll want something a bit more sophisticated.
They are essential for various tasks, from educational presentations to troubleshooting technical issues. Understanding the nuances of each tool empowers users to maximize their efficiency and effectiveness when working with visual elements.
Screen Recording Capabilities in Windows 11
Windows 11 offers several methods for recording screen activity. This includes built-in tools and third-party applications. Directly within the operating system, users can leverage the Game Bar for game recording, or utilize the Xbox app for broader screen capture options. The recording options are designed to accommodate a wide range of needs and preferences.
Functions of the Snipping Tool in Windows 11
The Snipping Tool in Windows 11 is a straightforward tool for capturing specific regions of the screen. It provides options for capturing free-form regions, rectangular regions, window captures, and full-screen captures. The tool offers basic editing features, allowing users to annotate their screenshots with text or shapes. This functionality enables users to easily highlight key elements or add comments to captured images.
Methods for Screen Recording in Windows 11, Microsoft windows 11 screen recorder snipping tool
Windows 11 offers a variety of methods for screen recording, catering to different user needs and preferences.
- Game Bar: The Game Bar is an excellent option for quickly recording gameplay sessions. It seamlessly integrates with Windows 11 and offers features specifically designed for capturing and sharing gaming content.
- Xbox App: The Xbox app provides more advanced screen recording options, including options for capturing and sharing screen recordings beyond gameplay.
- Screen Recording in the Action Center: Directly from the Action Center, users can initiate screen recording with audio, offering a quick and convenient method.
- Third-Party Applications: Various third-party applications extend the capabilities of screen recording, often with more advanced editing and customization options. These can be highly beneficial for specific tasks.
Comparison of Snipping Tool and Other Screen Recording Tools
The Snipping Tool provides a simple, basic approach to screen capturing. It excels in capturing specific portions of the screen quickly, but its features are limited compared to other dedicated screen recording software. Other options, like the Game Bar or Xbox app, offer more advanced capabilities, such as audio recording and more intricate editing tools, catering to diverse needs.
Key Features of Screen Recording and Snipping Tools
| Feature | Snipping Tool | Game Bar | Xbox App |
|---|---|---|---|
| Screen Capture Mode | Free-form, rectangular, window, full-screen | Full-screen, window, region | Full-screen, window, region |
| Audio Recording | No | Yes | Yes |
| Editing Features | Basic annotation (text, shapes) | More advanced editing options | More advanced editing options |
| Ease of Use | Very simple | Simple | Simple |
| Customization | Limited | Moderate | Moderate to High |
Capabilities of the Windows 11 Snipping Tool
The Windows 11 Snipping Tool, a built-in utility, offers a straightforward way to capture screenshots. It provides various modes for capturing different screen areas, allowing users to quickly and easily capture specific portions of the screen. This simplicity, combined with annotation capabilities, makes it a valuable tool for documentation, communication, and problem-solving.
Snipping Modes
The Snipping Tool offers four distinct snipping modes, each tailored to a specific capture requirement. Understanding these modes is crucial for efficient screen capture.
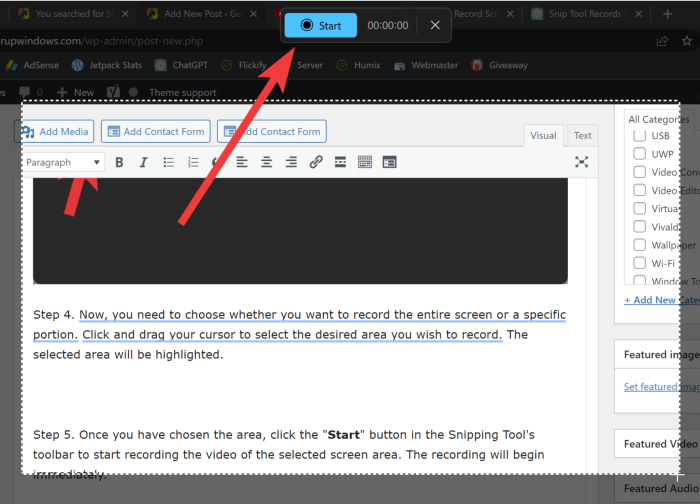
- Free-form Snip: This mode allows you to draw a freehand selection around the area you want to capture. This is ideal for capturing irregular shapes or portions of the screen that don’t align with standard rectangular or window boundaries.
- Rectangular Snip: This is the most common mode, enabling you to select a rectangular area for capture. It’s suitable for capturing entire windows, menus, or other predefined rectangular regions.
- Window Snip: This mode specifically captures the active window on your screen. This is extremely helpful for capturing the contents of a particular application or dialog box without unnecessary surrounding elements.
- Full-screen Snip: This mode captures the entire screen content. This is useful for capturing the entire desktop layout or for capturing system-wide messages.
Saving and Sharing Screenshots
The Snipping Tool provides versatile options for saving and sharing captured screenshots. The tool’s straightforward interface makes it easy to manage captured images.
- Saving Options: Screenshots can be saved in various formats, allowing you to choose the most suitable format for your needs. Commonly supported formats include PNG and JPG. This flexibility allows users to optimize file size and maintain image quality.
- Sharing Options: The Snipping Tool seamlessly integrates with other applications. You can directly share the captured screenshot with other applications or directly email it. This is convenient for quick communication and collaboration. The tool’s straightforward sharing options facilitate immediate collaboration.
Annotating Screenshots
The Snipping Tool allows for simple annotations on captured screenshots. This is essential for highlighting key elements or adding notes to captured images.
- Pen and Highlighter: The tool provides a pen and highlighter for adding notes or highlighting specific areas within the captured image. Users can select various pen colors and highlighter colors to emphasize specific points.
- Eraser: An eraser tool allows users to remove any unwanted annotations or markings, ensuring accuracy and clarity in the final image. This is crucial for editing and refining the screenshot before sharing.
Supported Image Formats
The Snipping Tool primarily supports two image formats:
- PNG (Portable Network Graphics): Preserves transparency and offers high image quality. This is generally a good choice for images containing complex details or elements requiring transparency.
- JPG (Joint Photographic Experts Group): Offers a good balance between image quality and file size. This is often preferred when file size is a concern.
Comparison with Other Screenshot Tools
| Feature | Snipping Tool | Other Screenshot Tools (e.g., Greenshot, Snagit) |
|---|---|---|
| Free-form Snip | Yes | Yes |
| Rectangular Snip | Yes | Yes |
| Window Snip | Yes | Yes |
| Full-screen Snip | Yes | Yes |
| Annotation Tools | Pen, highlighter, eraser | Advanced annotation tools (e.g., text boxes, shapes) |
| Supported Formats | PNG, JPG | Various formats (PNG, JPG, TIFF, etc.) |
This table highlights the basic comparison. Other tools often provide more sophisticated annotation options, but the Snipping Tool remains a convenient and straightforward choice for basic screenshot needs.
Screen Recording Features in Windows 11
Windows 11’s built-in screen recording capabilities offer a convenient way to capture your screen activity, whether it’s for tutorials, presentations, or troubleshooting. This feature seamlessly integrates with the existing Snipping Tool, providing a comprehensive solution for capturing both static images and dynamic video recordings. This section dives deep into the specifics of these recording options.The Windows 11 screen recorder simplifies the process of capturing and sharing your screen activity.
It allows you to record not only what’s displayed on your screen but also the accompanying audio, ensuring a complete recording experience. This versatility makes it an ideal tool for various use cases, from educational demonstrations to professional presentations.
Built-in Screen Recording Options
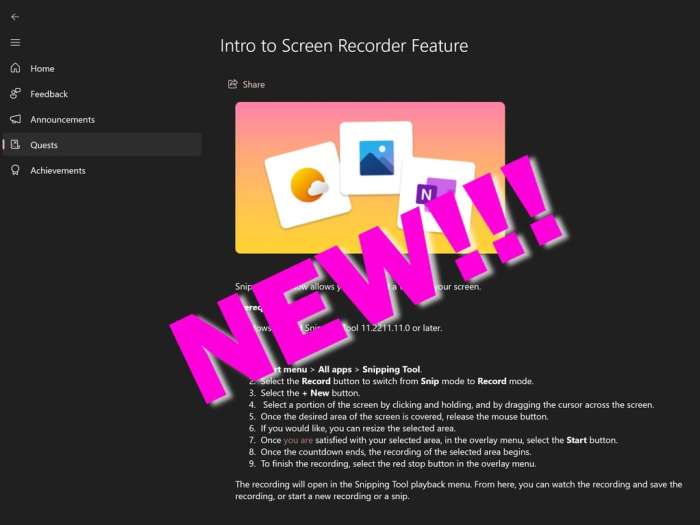
Windows 11 offers a straightforward method for initiating screen recordings. A dedicated screen recording button is available within the system’s accessibility options. The options include recording the entire screen, a selected region, or a specific window. This flexibility caters to different recording needs, ensuring you can capture exactly what you intend.
Recording Quality Settings
The quality of your screen recording can be adjusted to suit your needs and the intended use. Options exist to control the resolution, frame rate, and even the bit rate of the recorded video. Higher resolutions and frame rates produce higher-quality recordings but require more storage space. Lower settings result in smaller file sizes but may sacrifice visual clarity.
Recording Audio During Screen Recordings
Recording audio along with your screen activity is a simple process. Windows 11 allows you to select whether to include system audio, microphone audio, or both. This feature is particularly useful for creating tutorials or demonstrations where the accompanying narration or system sounds are essential.
Saving Recorded Videos in Different Formats
Windows 11 screen recordings are saved in the MP4 format by default. This widely compatible format ensures that your recordings can be played on a variety of devices and platforms. You can save your recordings in other formats as well, although compatibility may vary.
Sharing Recorded Videos with Others
Sharing your recorded videos with others is straightforward. You can save the file to a location on your computer and then share it through various methods, such as email, cloud storage, or direct sharing links. This easy-to-follow process simplifies the dissemination of your recordings.
Table of Available Screen Recording Options and Settings
| Option | Description | Settings |
|---|---|---|
| Entire Screen Recording | Records the entire contents of your screen. | Resolution, frame rate, bit rate, audio inclusion. |
| Region Recording | Captures a specific rectangular area of your screen. | Region dimensions, resolution, frame rate, bit rate, audio inclusion. |
| Window Recording | Records a specific application window. | Window dimensions, resolution, frame rate, bit rate, audio inclusion. |
| Audio Source | Specifies the audio source to be included in the recording. | System audio, microphone audio, or both. |
| Output Format | Determines the format of the saved video file. | MP4 is the default, other formats may be supported. |
Integration with Other Windows 11 Features
The Windows 11 Snipping Tool and screen recording capabilities aren’t isolated islands. They seamlessly integrate with other core Windows 11 applications, enhancing productivity and streamlining workflows. This integration makes capturing and sharing information more efficient. From annotating screenshots to embedding recordings into documents, the potential applications are numerous.The Snipping Tool, coupled with Windows 11’s built-in annotation tools, offers a comprehensive solution for creating and sharing visual content.
This allows users to add notes, highlight areas, and mark up recordings and screenshots directly within the application. This functionality is crucial for collaborative work and provides a quick and effective way to share information visually.
Integration with Other Applications
The Snipping Tool can be used to quickly capture a portion of the screen, or a full window, which can then be directly pasted into various other Windows 11 applications. This is particularly useful when collaborating on documents, presentations, or other projects. For example, a technical support agent can quickly capture a screen recording of a problem to effectively explain the issue to a user.
Ever wanted to record your Windows 11 screen? The built-in Snipping Tool is a handy little program for capturing specific parts of your screen. While not as comprehensive as dedicated screen recorders, it’s great for quick screenshots. In a similar vein, WhatsApp’s Android fingerprint unlock feature allows for secure access, mirroring the simplicity of the Snipping Tool’s user-friendly approach.
WhatsApp’s Android fingerprint unlock feature provides a quick and easy method for securing your messaging app. Ultimately, both tools excel at their respective tasks, streamlining digital interactions.
This is a far more efficient and often more understandable way to communicate than simply describing the steps.
Embedding Screenshots and Recordings
Capturing images and recordings can be directly integrated into documents and presentations. The Snipping Tool allows users to save the captured image or recording in various formats, including PNG, JPG, and GIF. These formats are widely compatible with popular word processing, spreadsheet, and presentation software. You can simply copy and paste the image or video into the desired application.
Moreover, some applications offer direct integration, allowing seamless insertion without the need for intermediate steps. This streamlined approach simplifies the process of sharing visual aids within documents or presentations.
Annotating and Marking Up Screenshots
Windows 11’s built-in annotation tools complement the Snipping Tool’s functionality. These tools allow for adding text, shapes, and other annotations directly to captured images. Users can highlight important areas, add comments, or draw attention to specific elements within the screenshot. This is especially beneficial for providing clear and concise explanations in documents or during presentations. The precision of annotations makes it easy to pinpoint details and guide the viewer’s focus.
Troubleshooting and Technical Support
Screen recordings are a vital tool for troubleshooting and technical support. By capturing a visual record of a problem, users and support personnel can accurately identify the source of a technical difficulty. The recording can be shared with support teams to pinpoint the problem, allowing for faster and more effective resolutions. In situations where verbal explanations might be insufficient, screen recordings become an invaluable tool, especially when demonstrating a series of steps or actions that lead to a specific issue.
Comparison with Built-in Annotation Tools
The Snipping Tool works in tandem with other built-in Windows 11 annotation features, such as the ability to add text, shapes, and arrows to captured images. While the Snipping Tool is primarily focused on capturing, the integration allows for direct markup within the same application. This approach streamlines the process, enabling quick and effective communication. The combination of these features offers a comprehensive solution for visual communication.
Advanced Techniques and Tips: Microsoft Windows 11 Screen Recorder Snipping Tool

Mastering the Windows 11 Snipping Tool and screen recording capabilities requires understanding advanced techniques for precise selections, efficient recordings, and customization. These techniques enhance the usability of these tools, enabling you to create more professional and effective content. By leveraging these advanced methods, you can optimize your workflow and produce high-quality outputs.
Precise Snipping Selections
The Snipping Tool offers more than just basic rectangular selections. Understanding these advanced methods allows you to create highly targeted and accurate captures. Precise selections are essential for capturing specific elements from a screen without extraneous information.
- Free-form Snips: This feature allows you to draw any shape around the desired area. This is particularly useful for capturing irregularly shaped elements or when a precise rectangular selection isn’t appropriate. For instance, capturing a specific graph or chart within a complex interface requires a free-form snip to isolate the data you need.
- Window Snips: This option lets you capture the entire content of an active window. This is ideal for capturing dialog boxes, menus, or applications without the need for manual resizing. This method is useful for capturing screenshots of full applications, reducing the need for extensive cropping and resizing afterwards.
- Full-screen Snips: Capturing the entire screen is a quick way to document the current state of your display. This is suitable for recording system-wide changes or for presentations that require a complete view of the desktop.
Advanced Screen Recording Methods
Beyond basic screen recording, Windows 11 offers advanced options for timed recordings and custom configurations.
- Timed Recordings: Setting a specific duration for screen recording is crucial for creating tutorials or demonstrations with precise timing. This feature allows for capturing activities within a predefined time frame, perfect for creating concise tutorials that focus on a particular task.
- Specific Area Recordings: Instead of recording the entire screen, you can define a specific region to record. This saves storage space and streamlines the recording process. For example, you can focus on recording a specific application window without including the entire desktop background.
- Microphone Integration: Recording audio along with your screen activity adds a layer of richness to your recordings. This is essential for tutorials that involve voice instructions or explanations. It ensures that the user not only sees the actions but also understands the accompanying commentary or instructions.
Customizing Keyboard Shortcuts
Efficient workflows rely on well-placed keyboard shortcuts. Personalizing these shortcuts can greatly enhance your productivity.
- Customizing Shortcuts: Windows 11 allows you to assign unique keyboard shortcuts for various actions within the Snipping Tool and screen recording. This is crucial for avoiding repetitive mouse clicks and maximizing your efficiency.
- Learning Existing Shortcuts: Familiarizing yourself with the existing keyboard shortcuts will help you understand the fundamental functions and optimize your workflow by using pre-defined shortcuts for common actions.
Optimizing Performance During Screen Recording
Screen recording can sometimes strain system resources, especially when recording high-resolution videos. Optimizing settings is key to ensuring smooth performance.
- Adjusting Resolution: Lowering the resolution of your recordings can significantly reduce the strain on your system. This is particularly useful when recording long videos or dealing with older hardware.
- Choosing Recording Format: Selecting appropriate video formats can balance quality and file size. For instance, choosing a more compressed format like MP4 can reduce the file size while still preserving essential visual details.
- Using a Dedicated Recording Software (Optional): While Windows 11’s built-in tools are sufficient for many users, dedicated screen recording software often offers more advanced features and customization options for optimizing performance and quality.
Creating Tutorials Using Screen Recordings
Screen recordings are indispensable tools for creating step-by-step tutorials.
- Structure and Clarity: Organizing recordings into clear, concise steps is crucial for creating user-friendly tutorials. Each step should focus on a specific task, improving comprehension and minimizing user confusion.
- Adding Text or Annotations: Highlighting key actions with text or annotations enhances the clarity and engagement of your tutorial. Annotations improve the tutorial by clearly indicating specific actions or important details for the user.
- Review and Editing: Thorough review and editing of your recordings is essential for creating a polished and professional tutorial. Reviewing your recording and editing any mistakes ensures a seamless and high-quality final product.
Common Keyboard Shortcuts
A quick reference for commonly used keyboard shortcuts.
| Action | Keyboard Shortcut |
|---|---|
| Open Snipping Tool | Win + Shift + S |
| Start Screen Recording | Win + Shift + G |
| Capture Full Screen | Alt + Print Screen |
| Capture Active Window | Alt + Print Screen |
Troubleshooting and Common Issues
Navigating the digital landscape often involves unexpected glitches. Screen recording and snipping tools, while generally reliable, can sometimes present challenges. This section provides a comprehensive troubleshooting guide to help you resolve common issues with Windows 11’s screen recording and Snipping Tool. Understanding the potential causes and solutions will empower you to effectively address problems and maintain a smooth workflow.
Common Screen Recording Problems
Various factors can hinder the smooth operation of screen recording. Insufficient system resources, outdated drivers, or conflicts with other applications can lead to issues. Furthermore, incorrect settings within the Snipping Tool or incompatibility with specific hardware can also cause problems. A clear understanding of these factors is crucial for efficient troubleshooting.
Troubleshooting Guide
- Issue: Screen Recording Stops Unexpectedly
- Possible Causes: Insufficient RAM, high CPU usage by other programs, or a faulty video driver. A sudden system shutdown during recording can also corrupt the process. Low storage space can also impact the recording.
- Solutions: Close unnecessary programs, restart your computer, and update your video drivers. Ensure sufficient storage space. If the issue persists, try recording in a different resolution or format to see if the problem is related to the video settings.
- Issue: Poor Recording Quality
- Possible Causes: Low recording resolution, poor hardware quality, or video encoding issues. A noisy or unstable internet connection while recording can also lead to a loss of quality. Incompatible software settings can also cause poor results.
- Solutions: Adjust the recording resolution to a higher quality setting. Try different video codecs. Ensure that the system’s hardware meets the requirements for smooth recording. If possible, test in a more stable internet environment.
- Issue: Snipping Tool Not Responding
- Possible Causes: Corrupted system files, incompatibility with specific applications, or insufficient system resources. Potential software conflicts can also be a factor.
- Solutions: Run a system file checker. Update the Snipping Tool to the latest version. Close other programs that might be using a significant amount of system resources. If the problem persists, reinstall the Snipping Tool.
- Issue: Screen Recording Audio Issues
- Possible Causes: Incorrect audio input settings, microphone issues, or incompatibility with the recording software. A faulty sound card or audio drivers can also lead to issues.
- Solutions: Verify that the correct audio input device is selected. Check the microphone’s status and ensure it is functioning correctly. Update your sound drivers. Check for recording software settings for audio inputs. If all else fails, test the recording with a different microphone or device.
Additional Tips for Smooth Screen Recording
- Ensure your system meets the minimum requirements for screen recording. Adequate processing power, RAM, and storage space are essential for smooth operation.
- Regularly update your system drivers, especially video and audio drivers, to resolve compatibility issues. Up-to-date drivers are crucial for optimal performance.
- Close unnecessary programs and applications to free up system resources. Minimize background processes for improved recording quality.
- Try recording in a lower resolution or format if the high quality option results in recording failure.
Comparison with Third-Party Tools
The built-in Snipping Tool and screen recording features in Windows 11 are convenient for basic tasks, but they might fall short for more advanced users. Third-party screen recording software often offers a wider range of functionalities and customization options. This section will compare the Snipping Tool’s capabilities with those of popular third-party alternatives, focusing on pricing, features, and compatibility.Third-party screen recorders frequently provide advanced features beyond basic screenshots and recordings, such as customizable recording areas, different output formats (including high-quality video), annotation tools, and editing capabilities.
Understanding the trade-offs between simplicity and extensive functionality is key to choosing the right tool for your needs.
Pricing Comparison
The Snipping Tool is a free built-in utility. This inherent advantage makes it an attractive option for users on a budget. Third-party screen recording software, however, often comes in various pricing tiers. Some are free with limited features, while others are paid for more comprehensive functionality and advanced options. Freeware often includes watermarks on recordings or limited recording duration, and paid versions typically offer extended features.
Functionality Comparison
The Snipping Tool is limited to basic screenshot capture and simple screen recordings. It lacks the editing features, advanced recording options, and compatibility with various file formats found in dedicated screen recorders. Popular third-party screen recorders often allow for custom recording regions, different output formats, annotations, and editing capabilities within the recording software itself.
Advantages of Built-in Tools
The Snipping Tool’s main advantage is its accessibility. As a built-in feature, it’s readily available without the need for downloads or installations. Its simplicity makes it ideal for quick screenshots and basic recordings.
Ever needed to capture a screen on your Windows 11 machine? The Snipping Tool is a fantastic built-in option, perfect for quick screen recordings. But before you dive into the world of screen captures, you might wonder about the minimum age to open a Gmail account, how old do you have be open gmail account ?
Regardless of your age, the Snipping Tool is a straightforward and powerful tool for Windows 11 users, offering flexibility in capturing various screen portions.
Disadvantages of Built-in Tools
The limitations of the Snipping Tool become apparent when compared to specialized screen recording software. Lack of advanced features like customizable recording regions, diverse output formats, and editing tools restricts its usefulness for more complex tasks.
Third-Party Tool Compatibility
Third-party screen recording software is generally compatible with Windows 11, but users should always check the software’s compatibility information on the vendor’s website. Ensure the software is updated to the latest version to avoid any potential compatibility issues.
Comparison Table
| Feature | Snipping Tool | OBS Studio | Camtasia |
|---|---|---|---|
| Pricing | Free | Free (with paid features) | Paid |
| Recording Area Customization | Limited | Extensive | Extensive |
| Output Formats | Limited (PNG, JPG) | Multiple (MP4, MOV, etc.) | Multiple (MP4, MOV, etc.) |
| Editing Tools | None | Basic | Advanced |
| Annotation Capabilities | Limited | Yes | Yes |
Security Considerations
Screen recording and the Snipping Tool, while convenient, come with inherent security implications. Understanding these risks and taking appropriate precautions is crucial for protecting sensitive information and maintaining privacy. This section delves into the potential vulnerabilities and offers practical advice for safe usage.Protecting sensitive data during screen recording sessions is paramount. Negligence can expose confidential information, leading to breaches of privacy and security risks.
This section will discuss practical measures to mitigate these threats.
Security Implications of Screen Recording
Screen recordings capture everything displayed on the screen, including sensitive data like passwords, financial information, and personal correspondence. This data can be easily misused if not protected, potentially leading to identity theft or financial fraud. Unintended disclosure of confidential information can have serious repercussions.
Protecting Sensitive Information During Recording Sessions
Taking proactive steps to safeguard sensitive information during screen recording sessions is vital. This includes employing password protection for sensitive files, applications, and accounts. Additionally, enabling multi-factor authentication strengthens account security. By implementing these precautions, individuals can significantly reduce the risk of unauthorized access to confidential data.
- Data masking and redaction: Before initiating a recording, mask or redact sensitive information on the screen. This involves temporarily obscuring sensitive information like usernames, passwords, or financial details. Employing software that masks sensitive data in real-time during screen recording is highly recommended.
- Access controls and permissions: Ensure that only authorized personnel have access to the recording software and the data being recorded. Implementing robust access controls and permissions prevents unauthorized access and misuse of the recordings.
- Password protection: Use strong, unique passwords for all accounts and applications accessed during screen recording sessions. Never share your passwords with others, and consider using password managers for enhanced security.
Potential Privacy Concerns Related to Screen Recordings
Screen recordings can potentially reveal private information about an individual’s activities and preferences. This includes browsing history, communications, and other sensitive data displayed on the screen. Careful consideration of privacy implications is crucial before initiating a recording.
Data Protection Measures When Using Screen Recording Tools
Implementing appropriate data protection measures when using screen recording tools is crucial. This includes choosing tools with robust encryption features and storing recordings in secure locations. Data protection measures should encompass the entire lifecycle of the screen recordings, from recording to deletion.
- Encryption: Employ encryption to protect screen recordings and screenshots. This involves converting the data into an unreadable format that can only be decrypted with a specific key. Using strong encryption algorithms is essential for data security.
- Secure storage: Store recordings in secure locations, such as password-protected folders or cloud storage services with strong encryption. Restrict access to these locations to authorized personnel only.
- Data deletion policies: Establish clear data deletion policies to ensure that recordings are deleted securely and completely when no longer needed. This helps prevent unauthorized access to sensitive information.
Recommendations for Securing Screen Recordings and Screenshots
Adhering to specific security protocols is vital for protecting screen recordings and screenshots. This includes adhering to company policies, regulations, and legal frameworks. Maintaining data security and integrity is paramount.
- Compliance with regulations: Ensure compliance with relevant regulations, such as GDPR or HIPAA, when recording or storing sensitive information. Understand the implications of data privacy regulations in your specific context.
- Data retention policies: Implement data retention policies to specify how long recordings should be kept and the procedures for securely deleting them. This prevents the accumulation of unnecessary data and minimizes the risk of data breaches.
- Regular security audits: Conduct regular security audits of screen recording tools and procedures to identify and address potential vulnerabilities. This proactive approach helps maintain a strong security posture.
Final Review
In conclusion, the built-in Windows 11 screen recorder and snipping tool offer a surprisingly comprehensive suite of features for capturing and sharing content. While third-party tools might provide more advanced options, the Snipping Tool excels in its simplicity and seamless integration with other Windows 11 applications. This guide has explored its capabilities, from basic snipping modes to advanced recording techniques and troubleshooting.
Remember to prioritize security and privacy considerations when using screen recording tools, especially when dealing with sensitive information. Mastering these tools will empower you to efficiently document, share, and communicate within the Windows 11 ecosystem.